Enable Archive Mailbox in Office 365 using EAC and PowerShell
Online Archiving is a secondary mailbox and provides some extra space for storing the Mailbox data. It has the additional 100GB space and by default, this Online Archive Mailbox is disabled for all Office 365 accounts. Once you enable the In-Place Archiving the users can move the primary mailbox data including emails, contacts, calendars, appointments, and attachments, etc into the Archive Mailbox and your Primary mailbox size will increase.
So here you can know how to enable In-Place Archive Mailbox in Office 365 Using the Exchange Admin Center or Windows PowerShell Command. After enabling the Online Archiving you can move your Primary data to Archive Mailbox. Here you can just follow all the instructions to enabling the In-Place Archive Mailboxes.
Method 1: Enable archiving in Office 365 by Exchange Admin Center:
The Archive mailbox is by default disabled so here I am going to explain how to enable the In-Place Archive Mailbox in Exchange Online environment by using the Amin Portal. So use the given step by step solution for assigning the Archive mailbox in o365 Cloud Platform.
Step 1: First login into Office 365 Admin Account, now an o365 home page will open on the screen. Here go to the Admin section>> Exchange via Admin center.
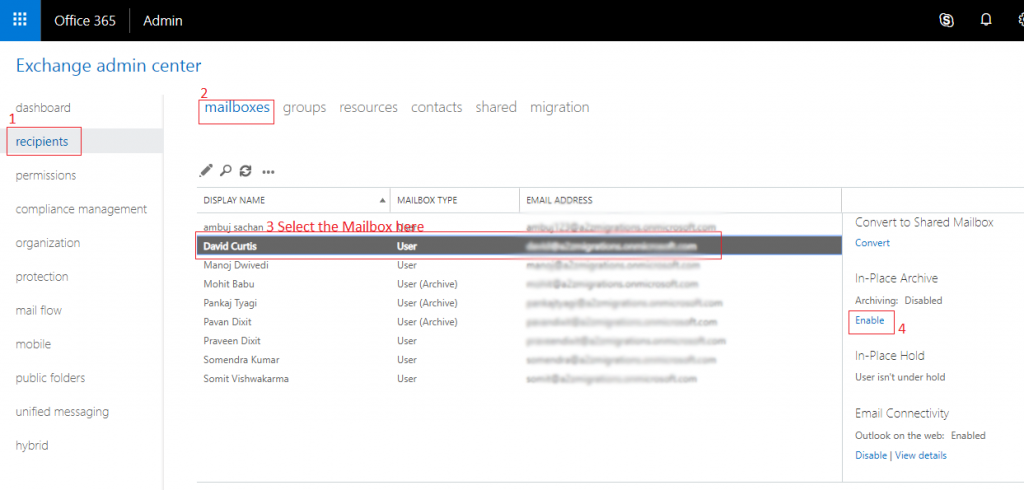
Step 2: After clicking on Exchange option a window will appear on the screen then go to the recipients >> mailboxes and select the user account in which you want to enable the Online Archiving. Now you will get some options on the right side. Once you scroll down you will see the In-Place Archive option just click on Enable>> Yes.

Note: Here you can also select the multiple user accounts and provide the Online Archive Mailbox authority to all. Once you add the multiple accounts just click on more options then go the In-Place Archive options and click Enable.
Method 2: Assign the Online Archiving for the user through the Windows PowerShell
If you want to use the PowerShell command to enable the Archive Mailbox in Office 365, then follow the solution of the enabling the In-Place Archiving.
First of all, open the Windows PowerShell as an administrator and put the following commands to enable the Archive mailbox in Office 365.
Step 1: Connect to the o365 Exchange Online to the PowerShell by entering the following commands.
$UserCredential = Get-Credential
$Session = New-PSSession –ConfigurationName
Microsoft.Exchange –ConnectionUri https://outlook.office365.com/powershell-liveid/
-Credential $UserCredential –Authentication Basic -AllowRedirection
Step 2: After connecting to the o365 Cloud Platform you need to assign the execution policy liked remote session by these given commands.
Set-executionpolicy remotesigned
Then hit the enter key on the keyboard and type Y to allow the services.
Step 3: Once you did just create the PSSession in the PowerShell
Import-PSSession $Session
Note: After importing the PS Session you can check the all mailbox by entering the following command.
Get-Mailbox
Step 4: Once you get the mailbox list you can select the mailbox and enable the In-Place Archive for that office 365 user account.
So put the given command to enable the Online Archiving.
Enable-Mailbox “UserName” –Archive
Note: In the UserName Section you need to type only the user name without the Domain
For Example:
Enable-Mailbox “aman” –Archive
Once you did the In-Place Archive Mailbox will be enabled for the o365 Exchange Online user account.
Inference: In this post, I explained how we can enable the In-Place Archive Mailbox in Office 365 User Mailbox. Here I also discussed you two methods by which you can easily enable the Online Archiving. If you still have any query related to this blog then feel free to leave a message on the comment box.
